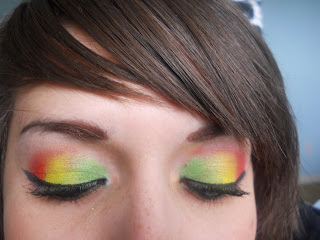
Friday, December 23, 2011

Everyday Natural Makeup Tutorial

Wow I haven't posted in a really long time! Sorry I've been sooo busy with school that its hard to find the time, but now that its Christmas break I found the time to play around with some makeup and make a few new videos :) I don't do natural makeup looks a lot, so I thought I might try one and work more with the neutral colors that I have. I titled this one "Morning Desert" for my video. I'll do a written tutorial here, and I'll  
include my video tutorial as well. Here are the pictures of the look.....


Step 1. Always cover your eyelid with a base so that the makeup stays and sticks on easier. 


Step 2. Here, I'm using a color from Mac. Its a really pale sandy color, almost white. Just apply a color like this to the inner corner of the eye and the inner third, or you can stop the color around the middle of your eyelid. its going to be blended later, so it where it ends doesn't have to be precise. 

Step 3: These are two sandy colors that come in my Coastal Scents 88 ultra shimmer palette. I mixed these two colors together and put that right next to the pale color. I used this for the rest of the eyelid. When you're using these light colors, dont let them go above the crease of the eye. 

Step 4: I used a light brown from the 120 palette and put that next to the light shimmery colors, only on the outer part of  the eye, just to give it a little more shape without having too much contrast before adding the darker brown. The darker brown will blend with the light brown, making it more seamless and blended instead of harsh. 


Step 5: I used this darker brown from the 120 palette and I used it on the outer V of the eye, where the crease and the lid connect at the outside of the eye. By using this dark brown, it will also help the black that we add later look more blended, instead of having this random black just starting.

Step 6: This is my favorite black eyeshadow, Carbon from Mac. This step is a little harder and hard to explain. Thats why I have a video. So basically, take a little brush and start at the outer third of your eyelid. Take the black and line just the outer third, as if it were eyeliner. Extend the line and make it thicker when your eyelid ends. Pull the shadow from the line that you made and create the v shape with your black eyeshadow, over the brown. Put a little bit of black in the crease, to help make the v shape.

Step 7: Take a reddish brown, and put this color over all of the other ones in the crease, blend this color with the other ones. 

Step 8: Apply eyeliner and mascara. When you are doing your eyeliner on the lid, make sure that you wing it out and follow the shape of the eyeshadow. 

Yay!! we're done! For those who like to tone it down, this is a really pretty look and can be worn anywhere

Saturday, September 17, 2011

The Importance of a Base

Hi! sorry its been such a long time since my last post, I've had a lot going on, but I just wanted to talk about a makeup secret that not many beginners know about, and that is how important it is to use an eyeshadow base.

A lot of times people ask me, how do you get your makeup to stay on all day? Mine rubs off before the morning's over! The reason is because I use an eyeshadow base. An eyeshadow base is this creamy substance that goes on your eyelid before you put any makeup on. The purpose of it is to make your makeup actually stick to your eyelid completely, but it also helps colors apply more smoothly, and can make the colors brighter. To put on a base, just take your finger and rub it all over your eyelid, its really easy, and taking these few seconds  is going to save your life hours later.

My favorite base is Mac's painterly paint pot. Its lighter than my skin tone, but I use it every day. Other good bases are Two Faced shadow insurance, Urban Decay's primer potion, and nyx jumo eyepencil. Bases don't always have to be skin tone colored, sometimes if I'm wearing bright makeup, I'll use a white base, because it makes bright makeup pop out that much more. You can also match the color of your base to whatever color eyeshadow you're using.


 Bases and primers dont have to be just for eyeshadow use, either. I learned this really awesome trick using a base to make your eyeliner on your waterline last, too. Basically you take a tissue or something and rub it on your waterline to dry it out, next take some of that base and rub it on your waterline. When you put your eyeliner on, it last soooo much longer than it would have otherwise.

So that is probably one of the most underestimated makeup products to ever exist. I couldn't live without a base, so I pray you will please take this into consideration instead of being one of those girls in the hallways asking me how I do it. :)

Sunday, July 24, 2011

Electro Rave makeup tutorial

Hello all! so the other day I was just feeling extremely bright and crazy as I was boaut to go to a dance partay, and I came up with a fantastic look that just....blows everyone away. It also glows under a blacklight so I thought that was a pretty cool twist. For this I'm just going to link my youtube video as it is a tutorial and show you pictures and such here!


btdubs this tutorial was soo much fun to make! I did a lot of extra editing and I really liked how it turned out.


Products:
Mac's painterly paint pot
Mac's electric eel
120 palette
Nyx jumbo eye pencil in milk
e.l.f. cosmetics

Monday, June 6, 2011

SUGARPILL: Review and Swatches

Hello everybody, the other day I received a package in the mail that I ordered from a makeup company called sugarpill. They're a new company, about a year old, and their products are fantastic. I only got three things (so far) but I still wnated to review them and show you what they look like and give you information and such anyway. I got two loose eyeshadows, and a pressed eyeshadow, because the palettes that they have on their website are currently sold out. Each eyeshadow is 12 dollars, which is fair because MAC charges 19.50 for a pigment which is 4.5 grams, and these are all 5 grams. Each package will come wrapped in pink tissue paper, with your order sheet, a sticker, her cards, a sample of a different loose eyeshadow, and your stuff. I got tiara, stella, and buttercupcake.


They all come with the sugarpill logo printed on the tops and names and little symbols on the backs.


The first loose eyeshadow I got was in tiara, a really shiny silver. The 3rd picture from the top is what the shadow looks like dry, and the 4th one is what it looks like when used wet. The last two are of a quick little look I did using tiara.


The next loose eyeshadow I was really excited about, and its a matte black with rainbow sparkles. Its hard to catch on camera, but in person it really looks like a night sky, and its suuuper pretty bacause it has a ton of sparkle. again, the 3rd picture is used dry, and the last one is used wet.


I got a pressed eyeshadow called buttercupcake, which is a bright yellow. I got this because all of the yellows I have don't have much pigment and don't work as well as this one. As you can see, they're quite big. The shadow on the right is MAC's electric eel, for comparison.

You can order sugarpill products at sugarpill.net and they also sell palettes and fake lashes. Go check all of the different colors out and yes, buy them because sugarpill is amazzing!

Tuesday, May 31, 2011

E.L.F.! e.l.f. e.l.f. e.l.f. e.l.f.....

So the other day I went over to Target with my gift card and I discovered this amazing brand called elf!!! I had heard about this brand through youtube and I thought it would be kindof expensive because so many pros use it and what not, and its actually the most inexpensive brand I've come across, and its amazing! I didn't get a lot there, but I did get three brushes, a gel liner, a liner pen, and a liquid eyeliner. I don't know if they have eyeshadows because I didnt see many, but there was also like, different colored eyeliner, concealer and highlighters, and a bunch of other stuff, so I'm just going to review the stuff I got.
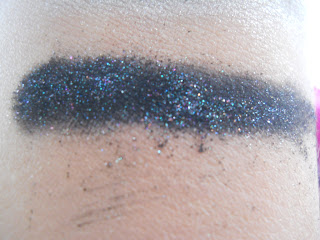
so first up are the liners. each liner I got was just 1 dollar, except for the gel liner which I think was 3.

This one is the liquid eyeliner, and I like it because its really dark and once it dries, it doesn't stain at all, which makes it easier to take off. The actual applicator is like a sponge thing, and not a brush, and its thicker than the last liquid eyeliner that I used which was from essence, so its a little harder for me to make a perfect straight line, and its easier to make mistakes, but with practice and a steady hand, its a really good liquid eyeliner.


This is the pen, and I looove it, so far. It has a ton of precision and control, so getting a perfect line or even drawing designs with it is really easy. My mom used it, and she said it was way better than Mac's liner pen. plus, our mac pen dried out so super fast and that was really a bummer, but I think I'll get a few extras of this one because its just so inexpenive, just a dollar, and its a really useful thing to have.

I ran out of cream liner, and I got this one just because I needed one, and its actually a really great gel liner. I was using one from physician's formula and after a while it got really rough and chunky, which is a very bad thing. This one is sooo smooth and it actually feels kindof warmon your skin because its so smooth. I use it in the water line and it stays on really well. The only problem is, after a few hours it tend to shift and stick to the tearduct, so you have to like, rub it out. My suggestion would be to line the outer edge of your waterline, and then stop halfway to the tearduct. Overall, its good stuff.

Here are the liners on my hand, and the bottom one is the liquid eyeliner, the middle one is the pen, and the top one is the gel liner. They all come off and they don't stain to make undereye circles.


brushes!!! the first one is the eyeshadow "C" brush, the 2nd one is their contour brush, and the last one is a fan brush. I love these brushes because they are all soft on the eyes. Brushes are hard to pick out because ones that feel soft can actually be really scratchy on your eye, and I wont use scratchy brushes. The first one I like to use for highlighting under the eyebrows and putting a light wash of color onto the eye. Its good if you dont want to completely pack color on, and prefer it to be a little more subtle. The 2nd one I reaaally like as a crease brush. I used to use a craft store brush for that purpose, but I would end up completely poking my eye socket to get all of the color on. This one actually puts on color so much better than my last one, and I barely have to touch my eye with it. The fan brush is good for sweeping away fall outs on your cheeks. With shimmer, you're going to get a lot of fall out and wiping it with your hand doesnt always work. Another tip to avoid fallout is to put your foundation on last. Love these brushes, they're only 3 dollars each, and I'm really excited about this brand.

Job well done, e.l.f.!!

Friday, May 27, 2011

RASTA makeup

ello I have a tutorial for you today, and it is rasta eyes. So I'll show you some pictures and such and I'll tell you how to do this with the step by step pictures along the way. ok? ok.


as you can tell, its just a really super easy 3 color thing, just don't blend it up too far and be sure to blend the colors together, or you'll look like a clown!

Step 1: First just apply a white base. you don't have to, you can use any base, but I do because itll make the colors a lot brighter and such. Im using NYX jumbo pencil in milk. It looks all messy, but thats ok because its just a base and you'll smudge it on with your finger.

Step 2: Take a light grass green and put it on the inner third of your eye to start. any light green will do.

Step 3: Go over the light green with a brighter green. here Im using the neonish green from the 120 palette. basically the brightest one.


Step 4: Take yellow and put it next to the green, on the middle third. be sure to blend it in. The yellow im using is from the 120 palette, but I wouldnt recommend it because it barely comes off so I have to pack on a ton for it to show up. Thats also why I use a white base. I just ordered buttercupcake from sugarpill though, so hopefully that'll do the trick.

Step 5: add bright red to the outer third, and blend it over the green and yellow just slightly, in the crease.


Step 6: just add your liner and mascara now!
yey we're done! you guys let me know if there's anything in particular you want to see!